Most people probably skipped right to this point. If you did, it should be easy enough with these examples if you do run into something go read the parts you skipped you may find the answers there you are looking for.
The first thing we want to do is setup the L2TP server. To do this select L2TP from the VPN section of the SmallWall interface. If you clicked the right thing you will have a screen that looks something like Figure 1.
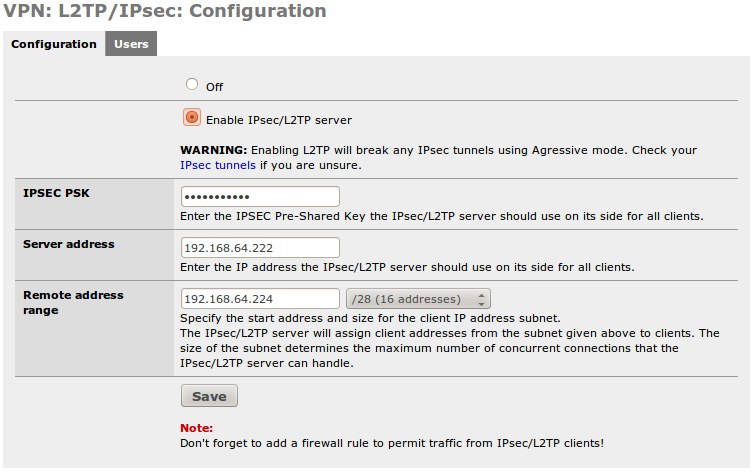
The next step is to enable the PPTP server. Click the “Enable PPTP server” radio button.
Now we select the preshared key. This is obfuscated in the GUI, but is stored in clear text in the config file.
The “Server Address” next. This can be an unused IP on your LAN, or another locally usable IP address in a separate subnet. It MUST be in the same networking class as the next entry.
Remote Address range. This is going to be the range of 16 IP addresses that the server will issue to clients. Notice the /28. It is there to remind you there will be 16 hosts. (Or whatever you choose) Again, this MUST be in the same subnet class as the IP listed above. (Not in the same /28 though…. If you try to overlap the two the firewall will tell you that you made a mistake.)
In our example we used 192.168.64.222 for the “Server Address” and 192.168.64.224/28 as the “Remote address range.” Think of the “Sever Address” as the default route for the IPs you are going to be issuing to the clients. It is also the virtual interface for the PPTP server.
Note
If you compare the PPTP config and this one, you will notice that the IP addresses are contiguous. In my environment, from 192.168.64.222 on is all VPN, in 34 contiguous addresses. This makes IP management easier.
If you are confused here, or in step 3, please go back and read the section named “Subnetting and routing” as it covered this in more detail.