A filtered bridge is a common way of configuring a DMZ segment. This can be used as a typical DMZ where you have hosts on the LAN interface, but is probably more frequently used to protect servers at a colocation facility where there are no LAN hosts.
Note
Remember you cannot access hosts on a bridged interface from a NAT'ed interface, so if you do have a LAN interface set up, you won't be able to access the hosts on the bridged interface from the LAN.
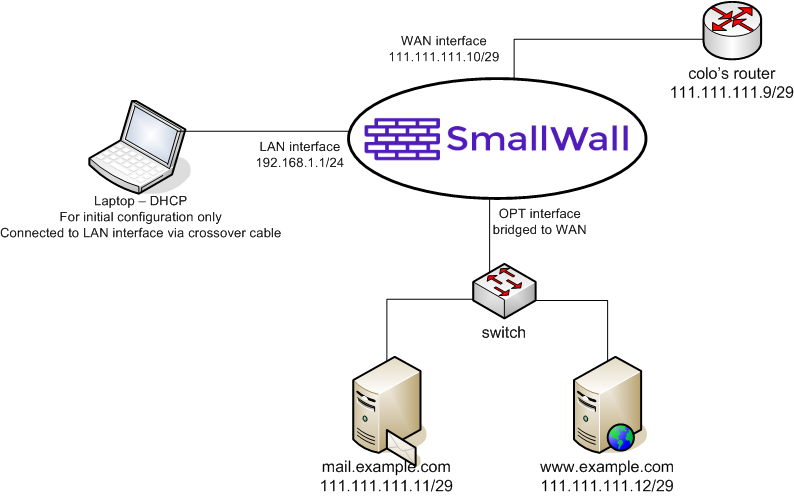
Network Diagram for this Configuration
The following diagram depicts the example configuration described in this section. The colocation facility has assigned you with the subnet 111.111.111.8/29, which includes usable IP's .9-.14. One of those is required for the colo's router, so you end up with 5 usable IP's.
After you have your network set up as shown, and the interfaces and LAN IP assigned appropriately, log into the webGUI to begin the initial configuration.
First go to System -> General setup, and configure the hostname, domain, DNS servers, change the password, switch the webGUI to HTTPS, and set your time zone. Click Save, and reboot SmallWall for the changes to take affect.
Log back into the webGUI and go to the Interfaces -> WAN page. For the example network, we'll assign the static IP 111.111.111.10/29, default gateway 111.111.111.9. Unless your WAN network is private IP's, check the "Block private networks" box. Click Save.
Click Interfaces -> OPT. Name the interface to your liking (for the example, we'll use Servers for the name). In the "Bridge with" box, select WAN. Click Save.
Go to the System -> Advanced page and check the "Enable filtering bridge" box. Click Save.
Go to the Firewall -> Rules screen.
Note
Chances are for any configuration, especially if you're restricting outbound connections, you'll need a much more involved ruleset than is depicted here. Open what you know you need open, and watch for dropped traffic in your logs to see what else you might need to open. It takes some effort to get your firewall locked down as tightly as it can possibly be, but the long term effect of increased security is well worth the time spent.
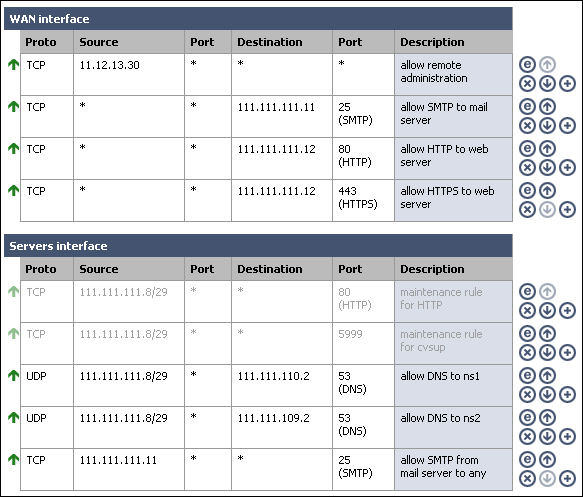
Initially, you may want to configure a rule on the OPT interface permitting traffic to anywhere, then after things are working, tightening that rules as desired. For this example, we'll go ahead and implement locked down rules from the get go.
The mail server on our bridged interface needs to send mail to any host on the Internet. Both servers need to get to DNS servers at 111.111.110.2 and 111.111.109.2. We'll add disabled maintenance rules for HTTP and cvsup.
Since this example portrays a firewall at a colocation facility, we need a remote administration rule to allow traffic from our trusted location's static IP access to administration functions of the servers, as well as the SmallWall webGUI. For this example, we'll permit all traffic from the trusted location (IP 11.12.13.30). You may want to tighten this rule. If you don't have anything on the LAN segment, remember to allow remote administration from somewhere so you can get into the webGUI without being on site.
We also need to add rules to permit SMTP traffic to the mail server and HTTP and HTTPS traffic to the web server.
You can leave or remove the default LAN to any rule if you don't have hosts on the LAN interface. In the example, the LAN interface will be unplugged once the onsite configuration is completed.

